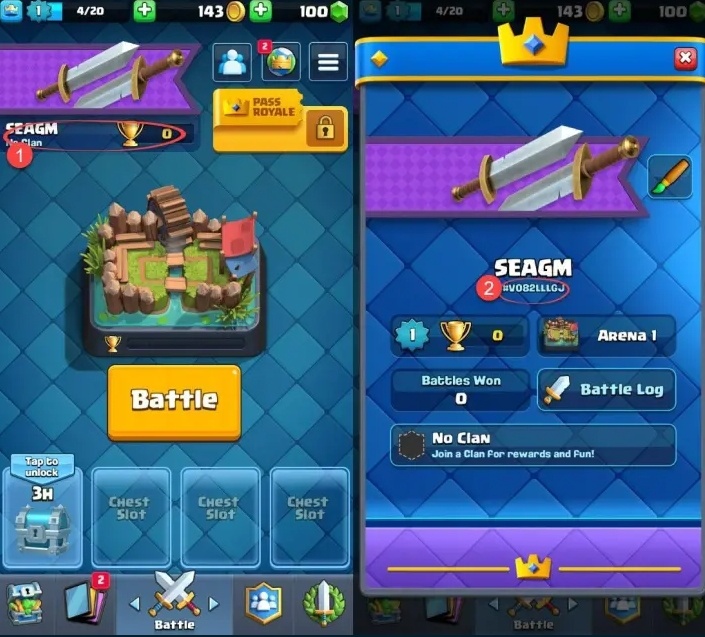
1. Log into Clash Royale using your game account
2. Select your profile name from the Battle screen
3. Your Player ID (UID) will be shown
Did this answer your question?
Yes / No
For additional assistance, reach out to our Support Team.
1. Launch Monopoly GO and click the menu button in the upper-right corner
2. Go to Settings
3. Scroll to the bottom to view your User ID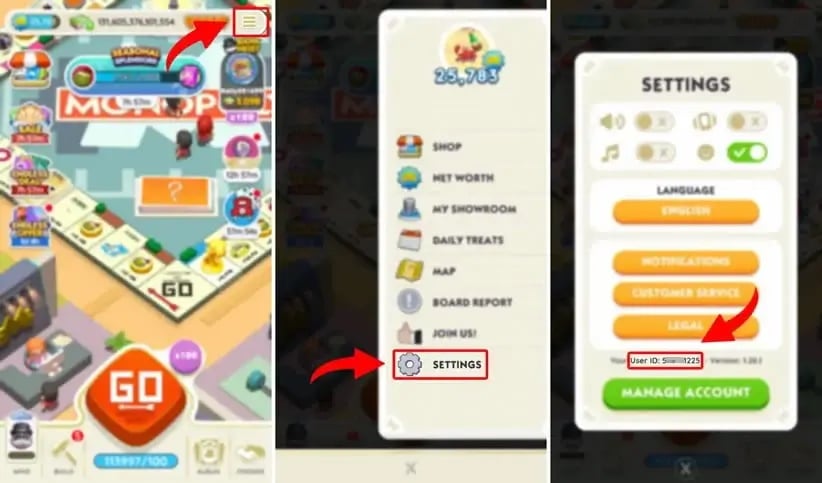
Did this answer your question?
Yes / No
For additional assistance, please reach out to Online Support.
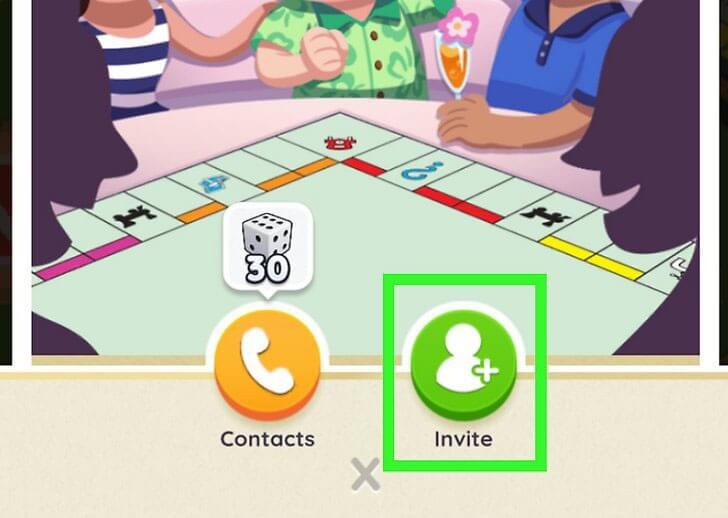
1. Enter the Friends section (handshake icon).

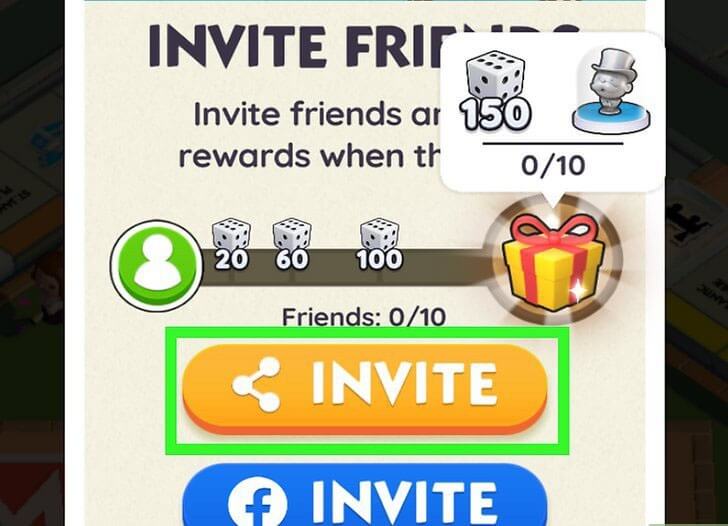
2. Tap the green Invite button for new players.
3. Use the yellow button to create your invite link.
Was this guide useful?
Yes / No
If you need more help, our Support Team is here for you.
Account Registration
1. Why choose www.ezbuff.com?
EZBUFF has over five years of experience in the MMORPG services industry. Our biggest advantage is competitive pricing. We constantly review market prices and adjust ours to stay among the lowest available. Lower prices never mean lower quality—our long-term success and loyal customer base demonstrate our commitment to reliable service and customer satisfaction.
2. Do I need to register an account to make a purchase?
Creating an account is recommended but not required. Registered users can:
-
View order history
-
Track order status
-
Access additional member benefits
If you prefer, you may also place orders as a guest. However, guest orders cannot be tracked through an account.
3. Can I register using a temporary or fake email address?
We strongly advise against this. Order updates, confirmations, and important notifications are sent via email. Using a valid, frequently checked email ensures smooth order processing and communication.
4. Can I use an incorrect phone number during registration?
This is not recommended. For certain orders, phone verification may be required. If we are unable to reach you, your order may be delayed or canceled.
Payments
1. What payment methods are available?
Currently, we accept:
-
PayPal
-
Credit Cards
-
Debit Cards
-
Western Union
2. How do I pay with a credit or debit card?
After being redirected to PayPal, select the option to pay directly with a credit or debit card. If your payment is declined, PayPal support can help identify the issue, as some cards may not be supported.
3. My card is not in USD. Can I still pay?
Yes. PayPal will process the payment, and your bank or card issuer will automatically handle the currency conversion based on their exchange rate.
4. How do I pay via Western Union?
You can find step-by-step instructions on Western Union’s official website. Please follow their guidelines carefully to complete your payment successfully.
5. What is a pending eCheck?
A pending eCheck is an electronic check payment through PayPal. Like traditional checks, it usually takes 3–5 business days to clear. Once PayPal confirms the funds, your order will be processed immediately.
6. Is payment on www.ezbuff.com secure ?
Absolutely. EZBUFF is protected by advanced security systems and verified by trusted authorities such as VeriSign and McAfee. All customer information and payment data are encrypted and never shared with third parties.
Orders & Delivery
1.How fast are orders processed?
Most orders are processed within 1–5 minutes. Some orders may require phone verification, so please keep your phone available for up to 30 minutes after placing an order.
2. Why is phone verification sometimes required?
Phone confirmation helps ensure all order details are accurate and prevents unauthorized transactions.
3. How long does delivery take after payment?
Most deliveries are completed within 15–45 minutes. Special cases may require additional verification, which can cause delays. If needed, our team will contact you via email or phone.
4. Why does stock sometimes run out after I place an order?
Due to high demand, stock levels update frequently. While rare, temporary shortages may occur even if stock was available moments earlier.
5. How is game currency delivered?
Game currency is typically delivered via:
-
In-game mail
-
Face-to-face trade
Delivery methods may vary depending on the game. Please contact Live Chat Support for detailed instructions.
Was this article helpful?
Yes / No
Have more questions? Contact Online Support
Helpful | Thanks for your feedback!
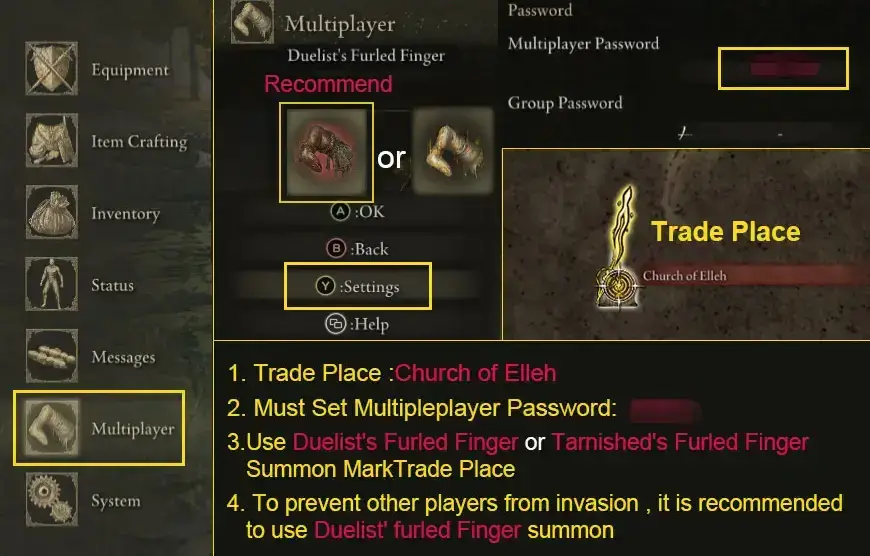
Preparation Before Trading
Before starting the trade, set a multiplayer password in your settings. We recommend using a 4–6 digit number to avoid interference from other players.
Fast & Secure Trading Tips
1. How Will I Receive My Order?
-
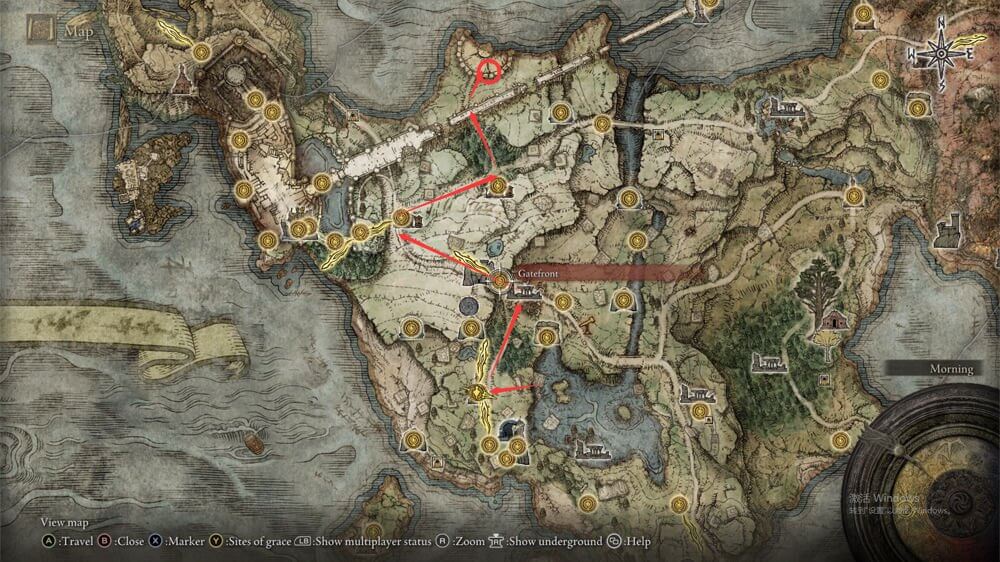
Place your summon sign near the Site of Grace at the Church of Elleh
-
Avoid hiding your sign in corners or behind objects
-
If all items are not delivered in one session, simply place your sign again after returning to your world. You will be summoned again to finish the trade.
2. How to Prevent Invader Interruptions?
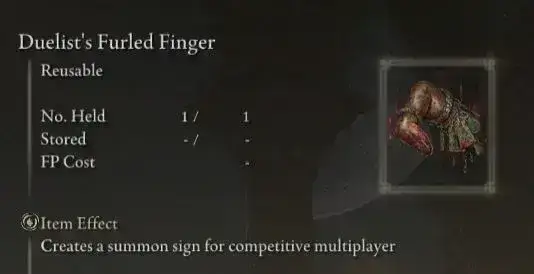
To minimize the chance of invaders, we strongly recommend using the Duelist’s Furled Finger, which limits unwanted invasions during trading.
How to Obtain Duelist’s Furled Finger:
You can find it in the northern area of Limgrave, located on a burned corpse near the Frustrated Spirit.

3. Picking Up Items Faster
Equip a shield and enter a defensive stance while collecting items. This helps you pick up dropped items more quickly and smoothly.
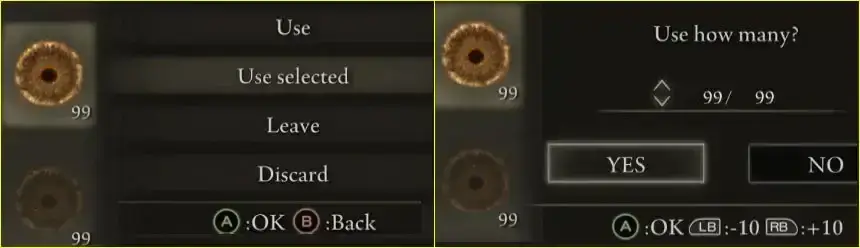
4. Completing Large Rune Trades Efficiently
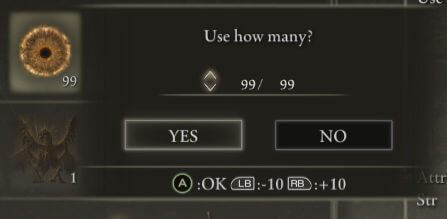
If you’re purchasing a large number of runes:
-
Pick up the runes
-
Open your inventory
-
Select Lord’s Rune
-
Choose Use Selected and consume 99/99 at once
After using the runes in your inventory, you can continue picking up remaining runes on the ground. As long as you don’t die or exit the game, the remaining runes will stay available.
Was this article helpful?
Yes / No
Need more help? Contact Online Support
Helpful | Thanks for your feedback!
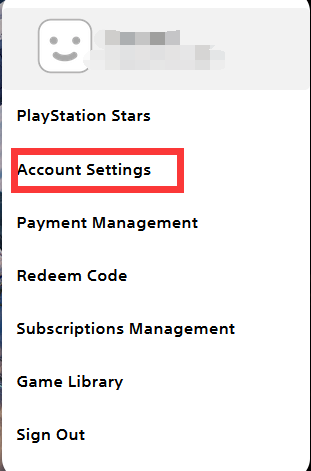
1. Sign in to your account at the official PlayStation website
2. Open Account Settings and select Security
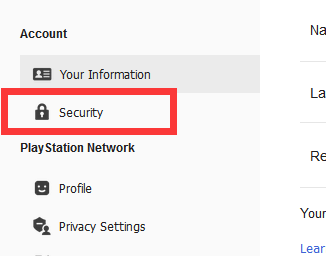
3. Locate the 2-Step Verification section
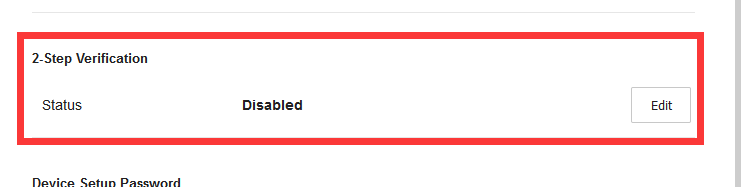
4. Turn on 2-Step Verification
Once enabled, your PSN backup codes will be generated automatically.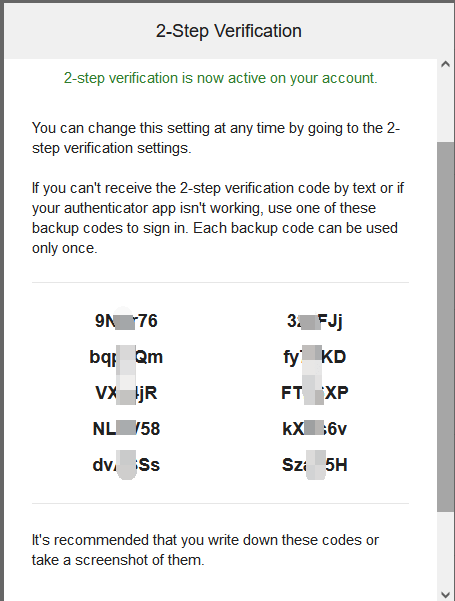
Was this article helpful?
Yes / No
Need more help? Contact Online Support.
Was this article helpful?
Have more questions? Online Support
1.Select Your Game
Begin by picking the game where you want to convert your Zen into Astral Diamonds.
2.Access the Sell Zen Page
Go to the section dedicated to selling Zen.
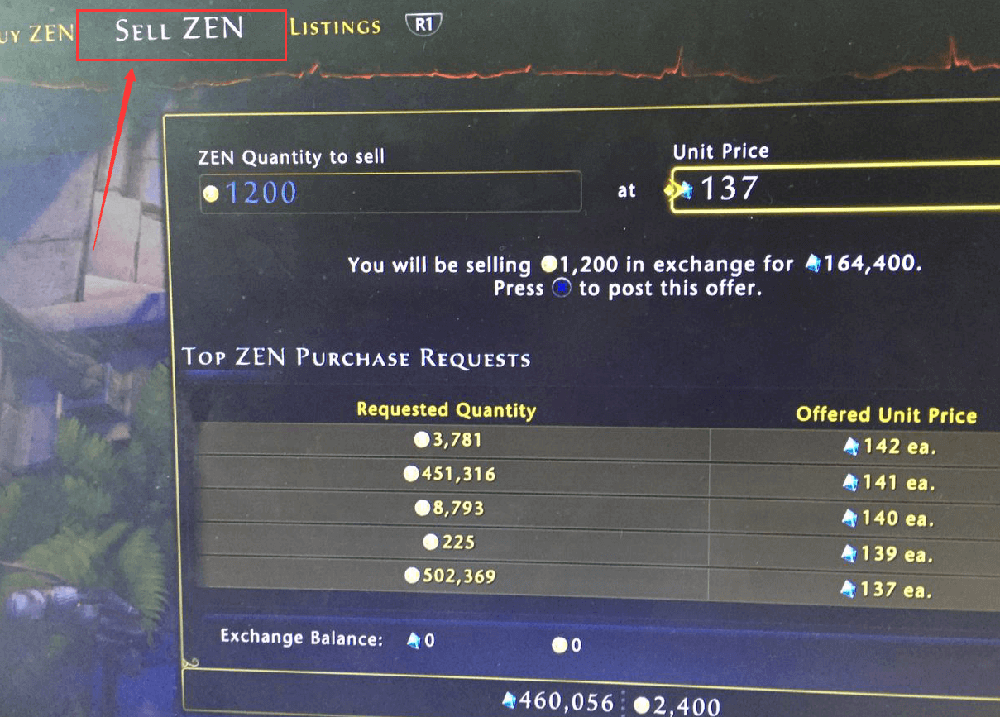
3.Choose Quantity and Price
Enter the amount of Zen you wish to sell and set a unit price.
Tip: Selling at the lowest current price ensures a faster transaction.
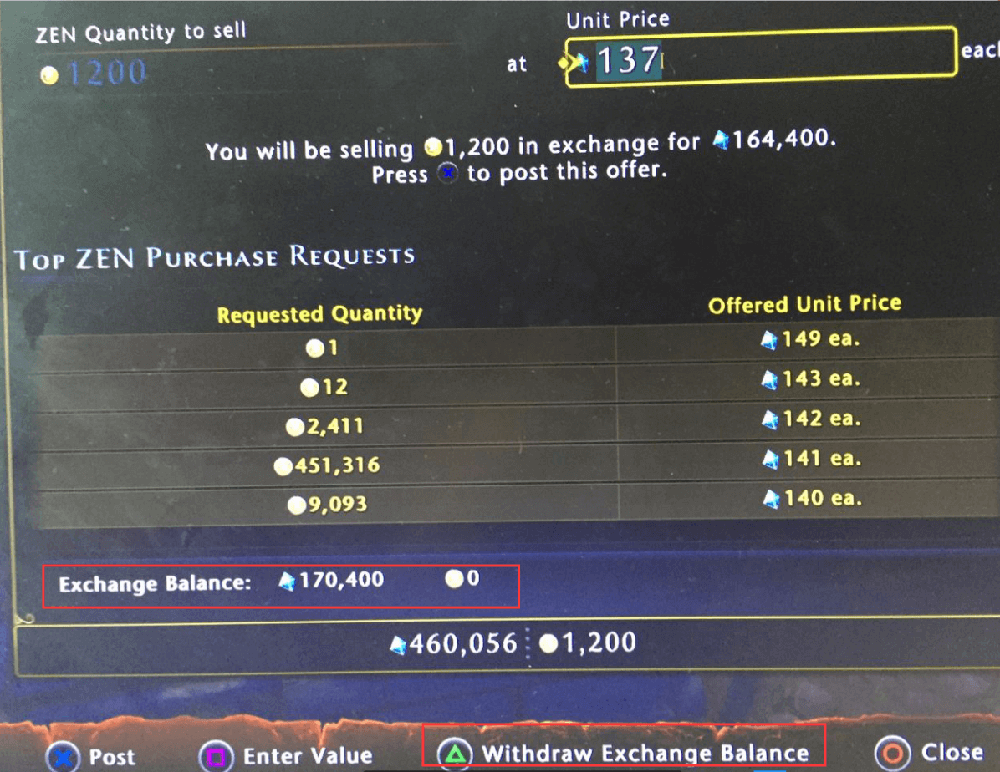
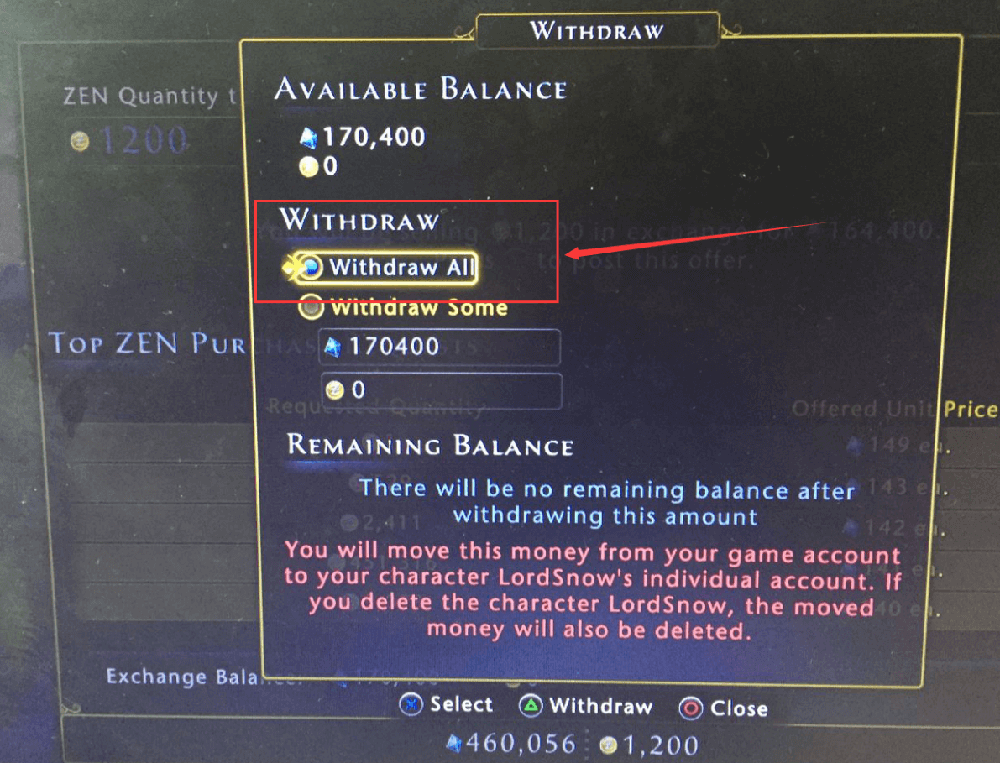
4.Receive Your Astral Diamonds
Once the sale is complete, withdraw your Astral Diamonds safely to your account.
Was this article helpful?
Have more questions? Online Support
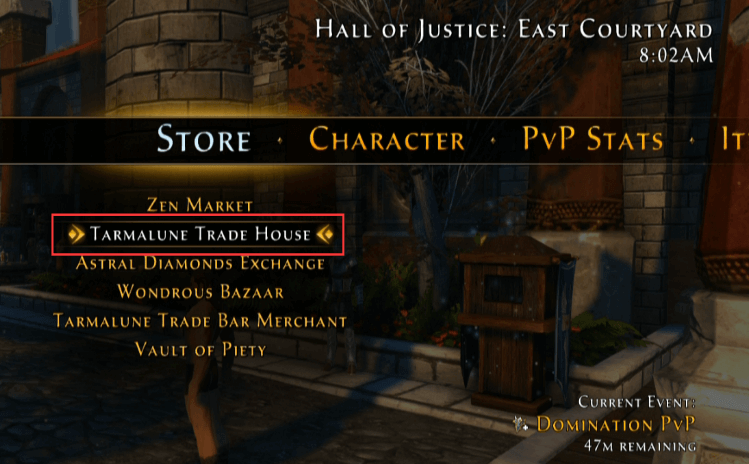
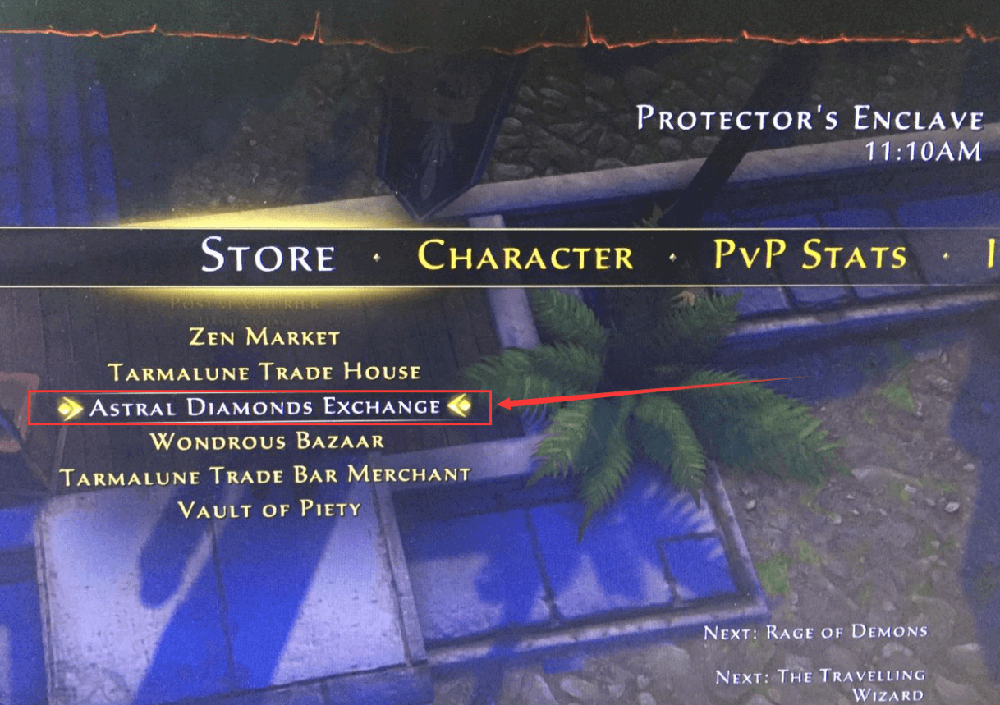
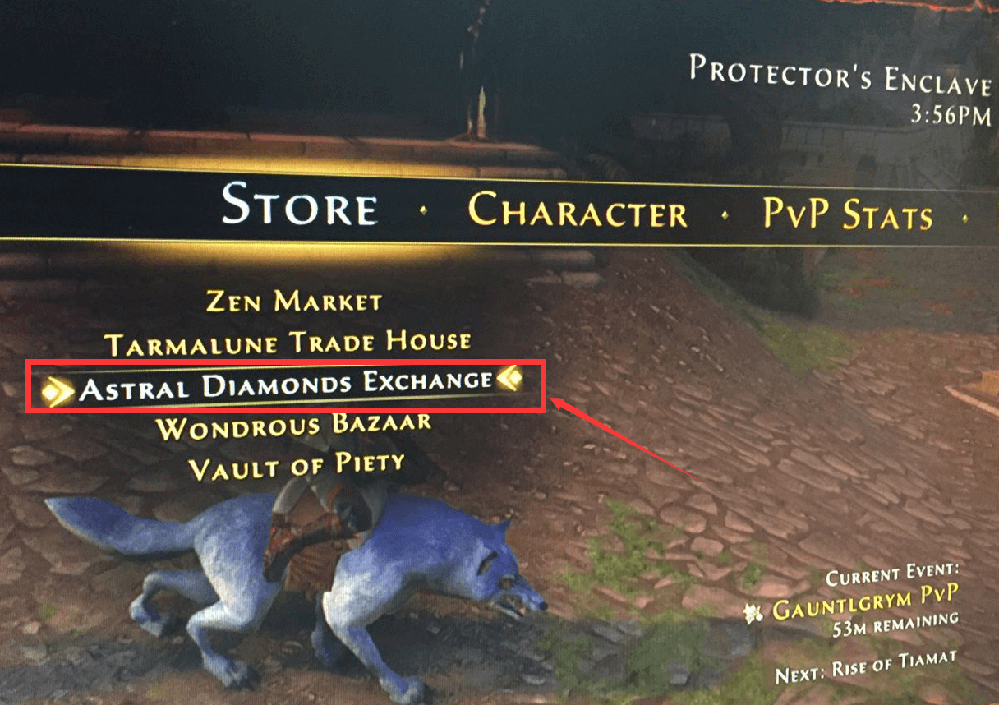
1.Choose Your Game for Astral Diamonds Exchange
Enter the Astral Diamonds Exchange section and select Neverwinter (Xbox).
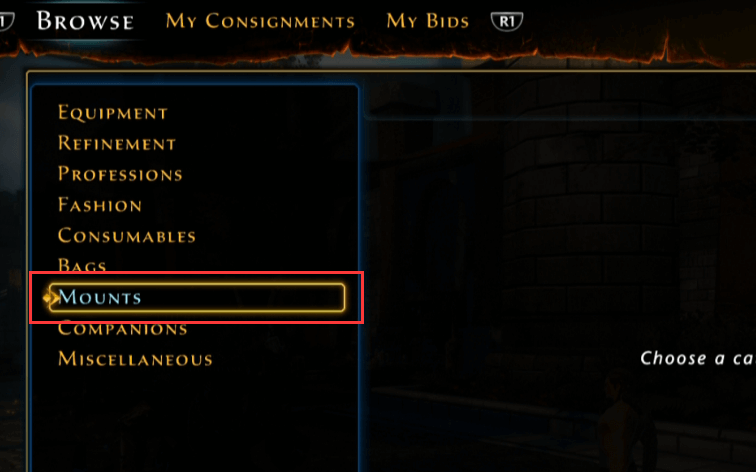
2.Go to the Sell Zen Page
Switch to the option where you can list your Zen for sale.
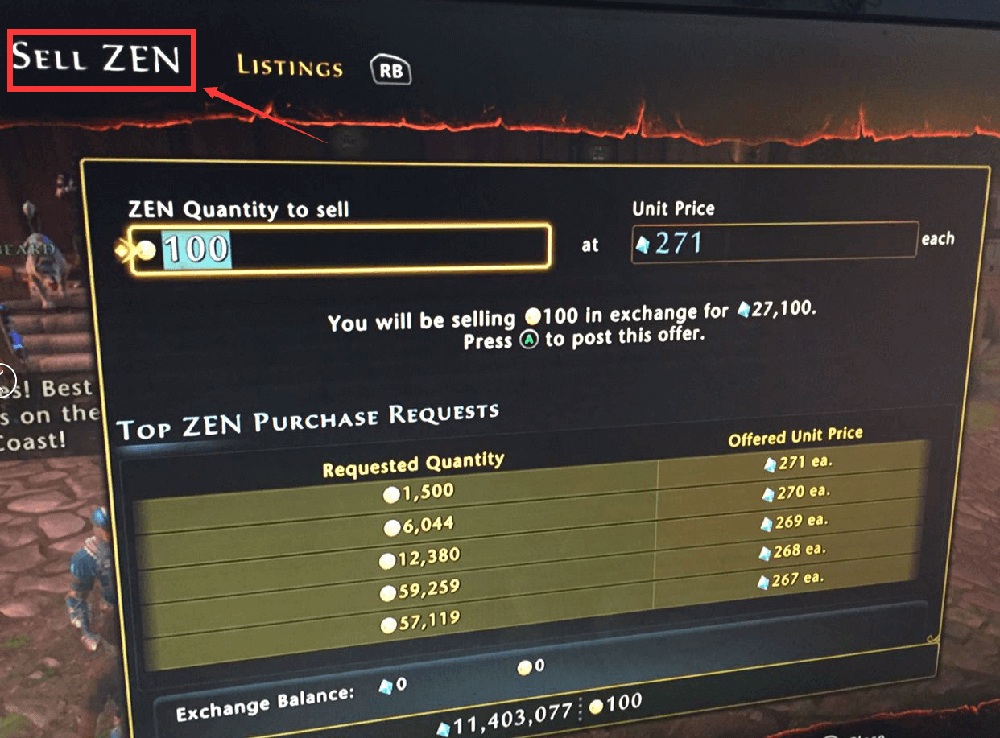
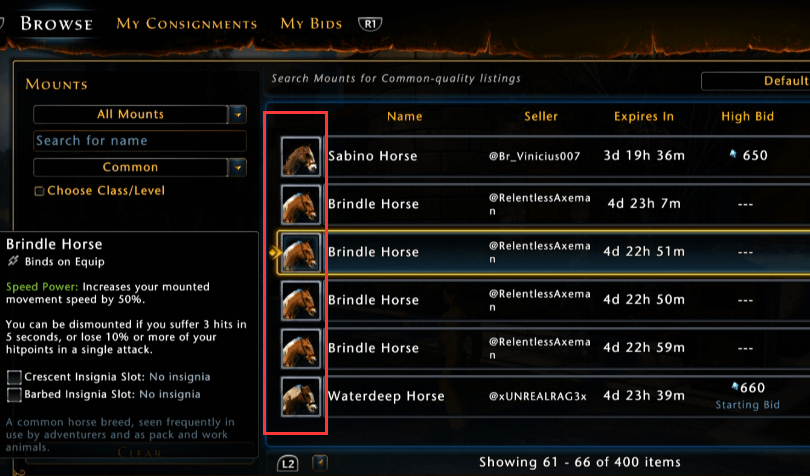
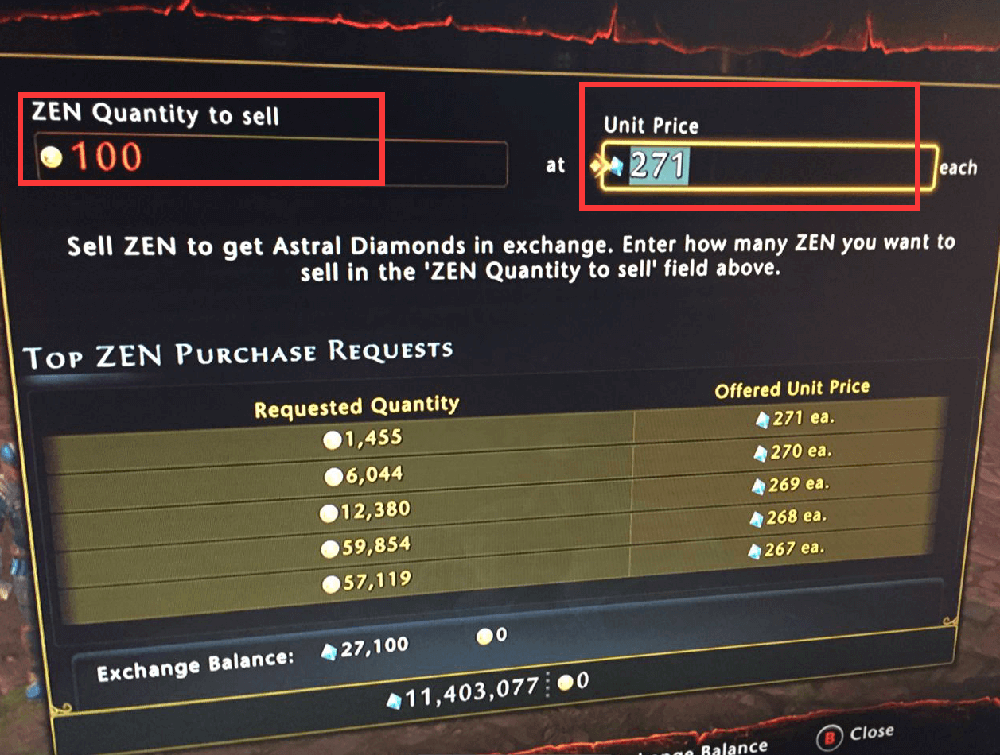
3.Set the Amount and Selling Price
Enter the quantity of Zen you want to sell and define the unit price.
Tip: Pricing your Zen at the current lowest market rate can help complete the sale faster.
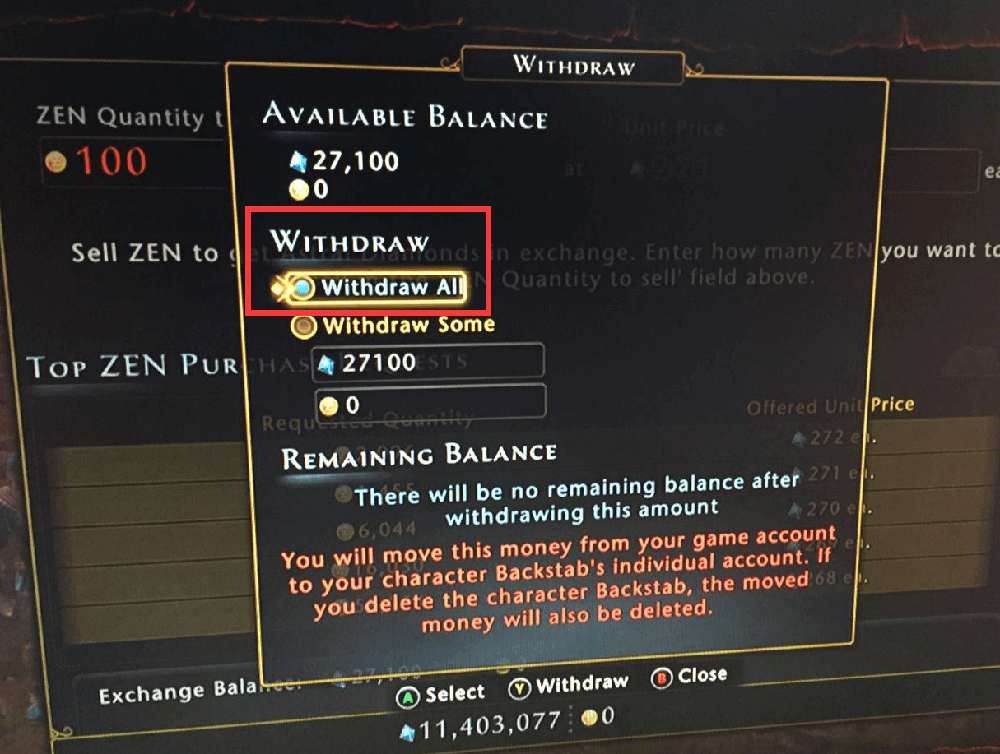
4.Collect Your Astral Diamonds
Once the transaction is complete, withdraw the Astral Diamonds to your account.

Was this guide helpful?
Yes / No
Need more assistance? Contact Online Support.
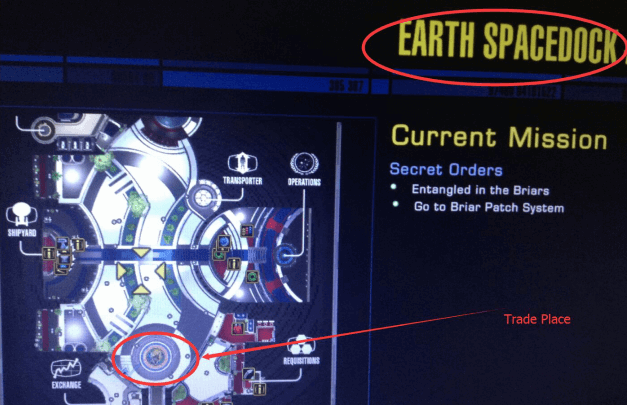
Faction: Starfleet
Trade Location: Earth Spacedock
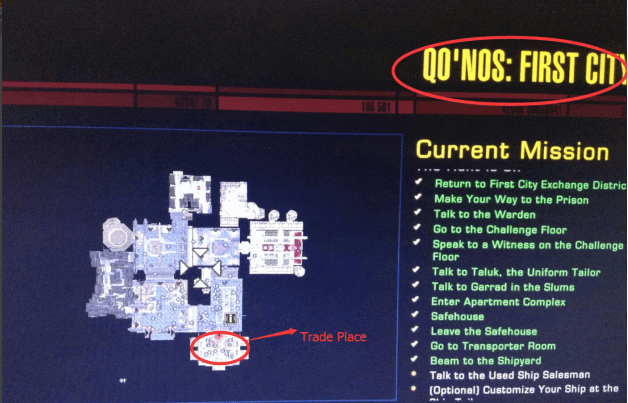
Faction: Klingon
Trade Location: First City
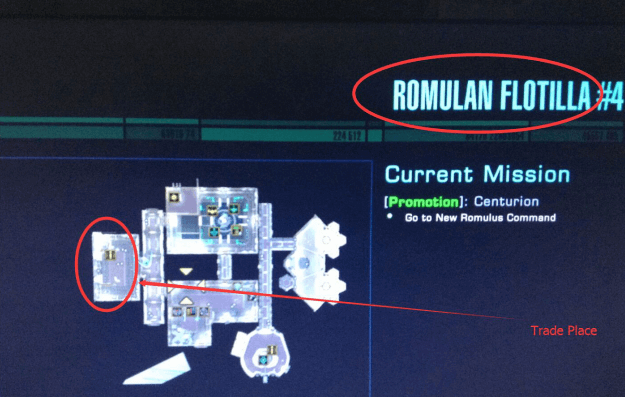
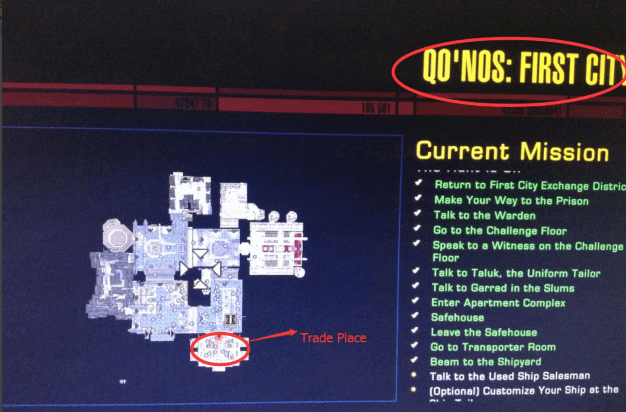
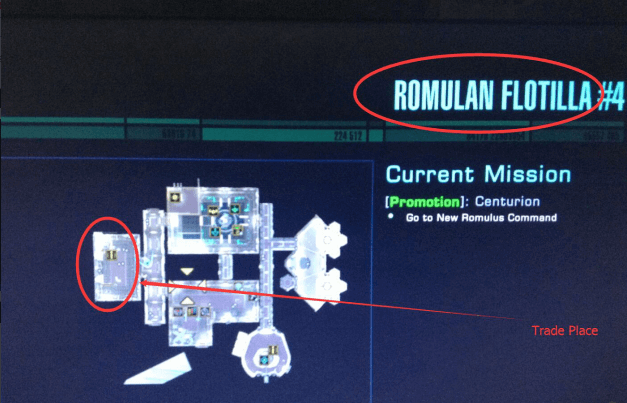
Faction: Romulan
Trade Location: Romulan Flotilla
Was this article helpful?
Yes / No
Have more questions? Online Support
Helpful | Thanks for your feedback!
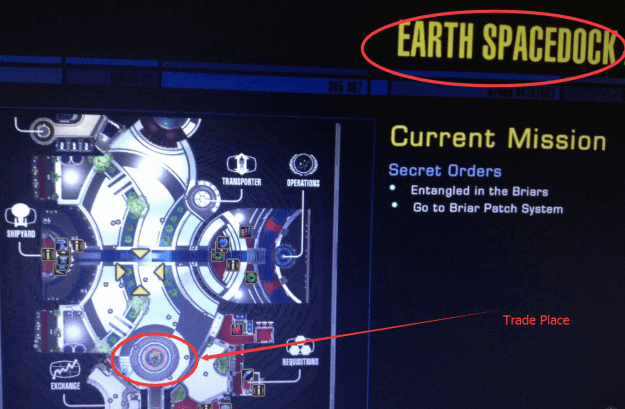
Faction: Starfleet
Trade Place: Earth Spacedock
Faction: Klingon
Trade Place: First City
Faction: Romulan
Trade Place: Romulan Flotilla
Was this article helpful?
Yes / No
Have more questions? Online Support
Helpful | Thanks for your feedback!
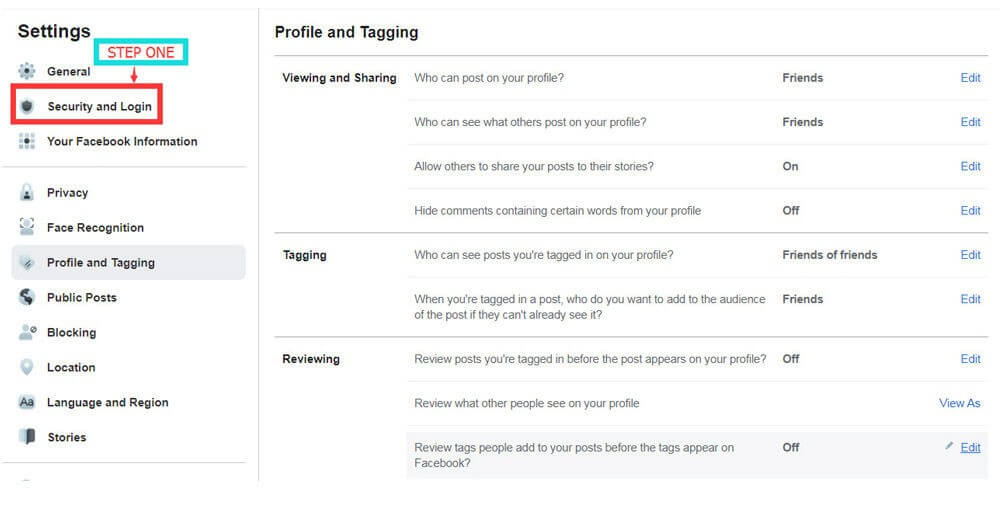
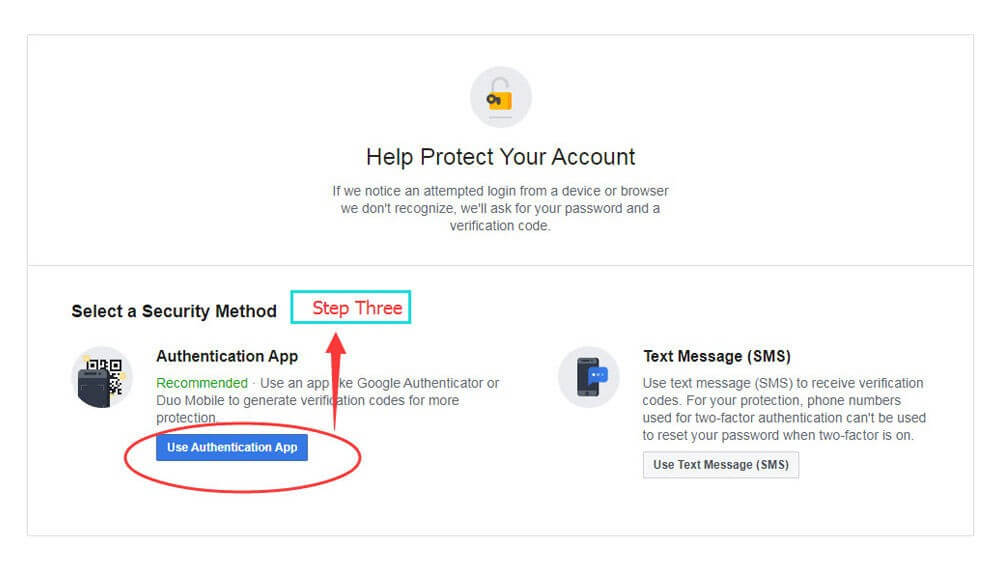
Step 1:
Go to Facebook Settings and navigate to Security and Login.
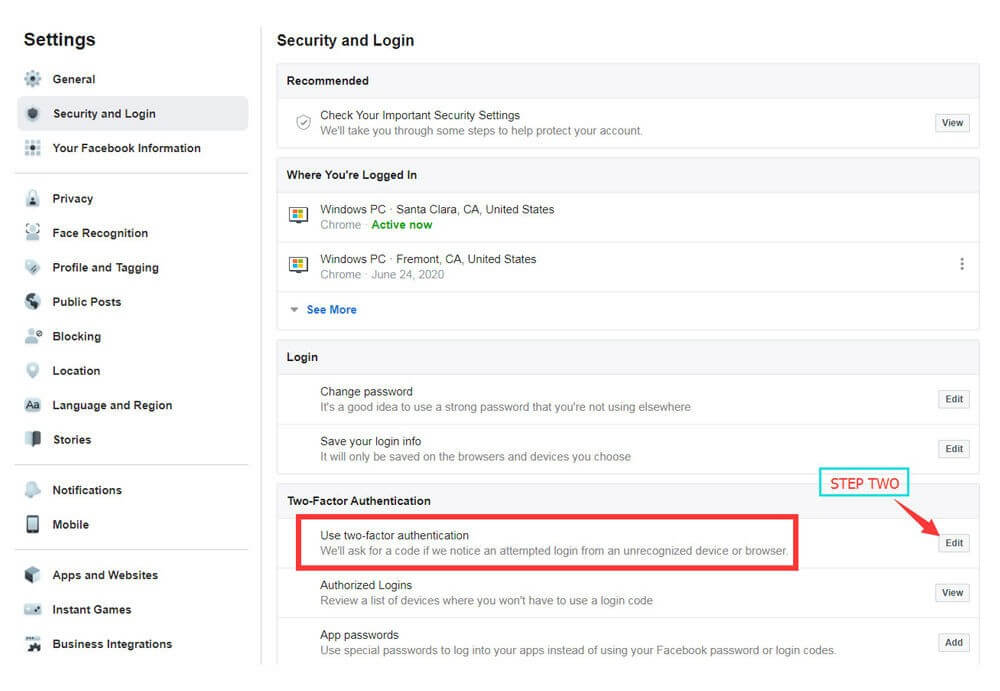
Step 2:
Locate Two-Factor Authentication and click Edit.
Step 3:
Select Use Authentication App, then download an authenticator app from your app store.
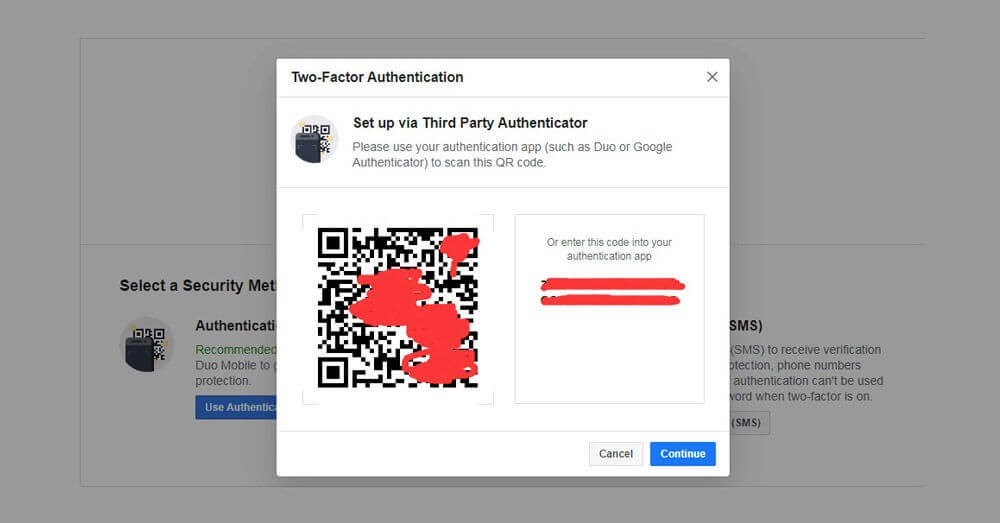
Step 4:
Open the authenticator app and scan the QR code shown on Facebook.
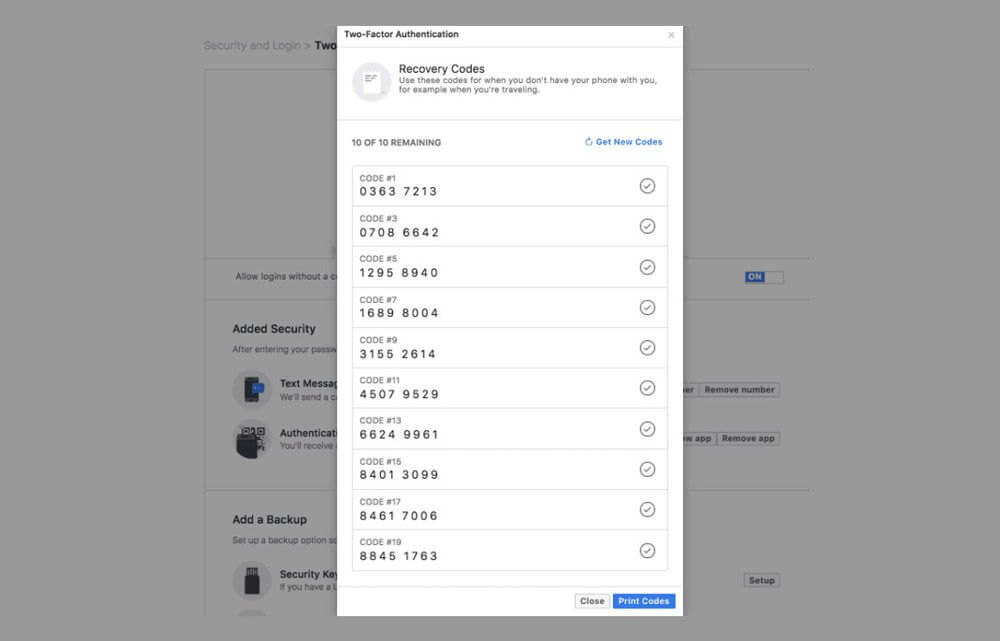
Step 5:
After setup is complete, you will receive your recovery (backup) codes.
Was this article helpful?
Yes / No
Have more questions? Online Support
Helpful | Thanks for your feedback!
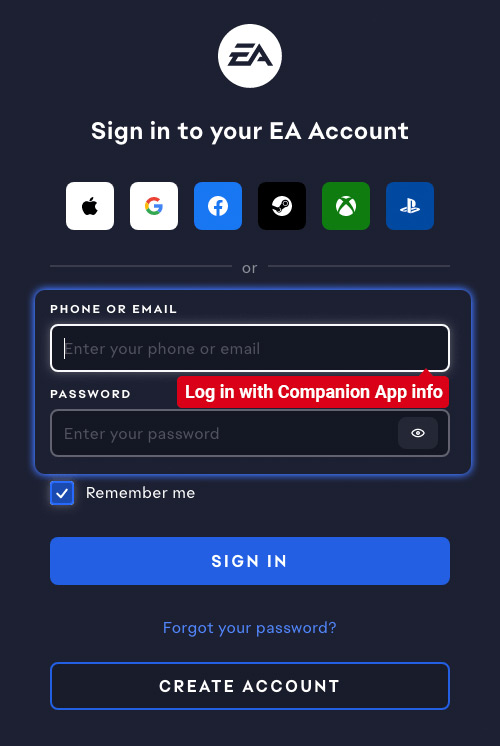
Step 1:
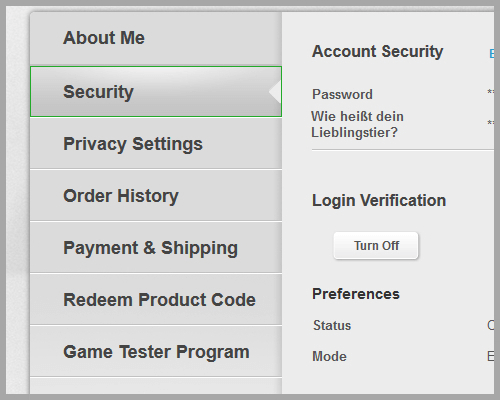
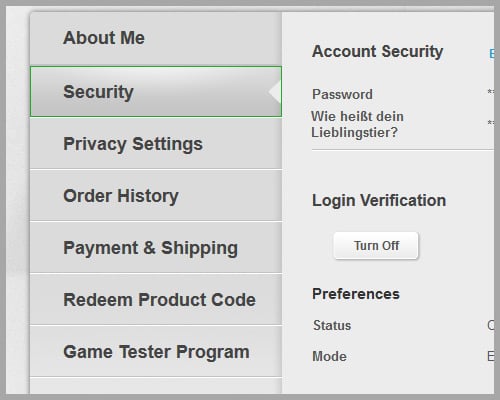
Go to the EA Account Security page.
Step 2:
Open the Security section in your account settings.
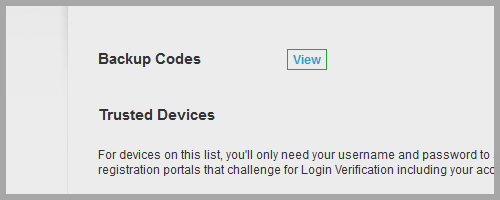
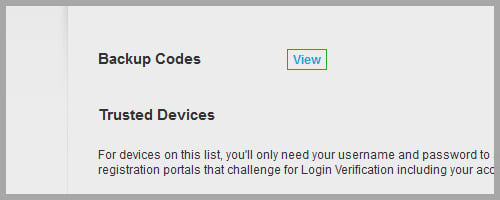
Step 3:
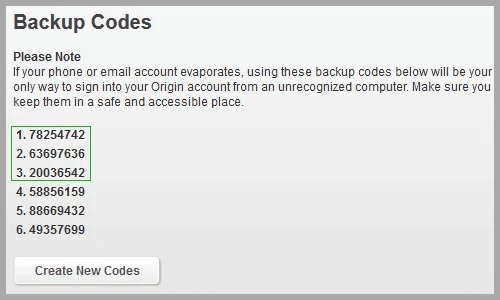
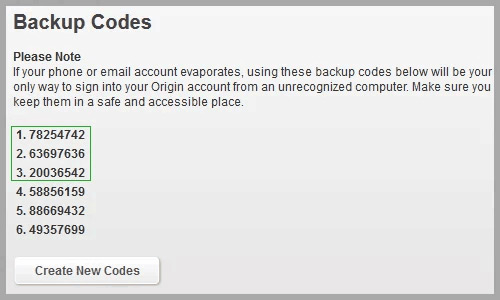
Select View Backup Codes to access your recovery codes.
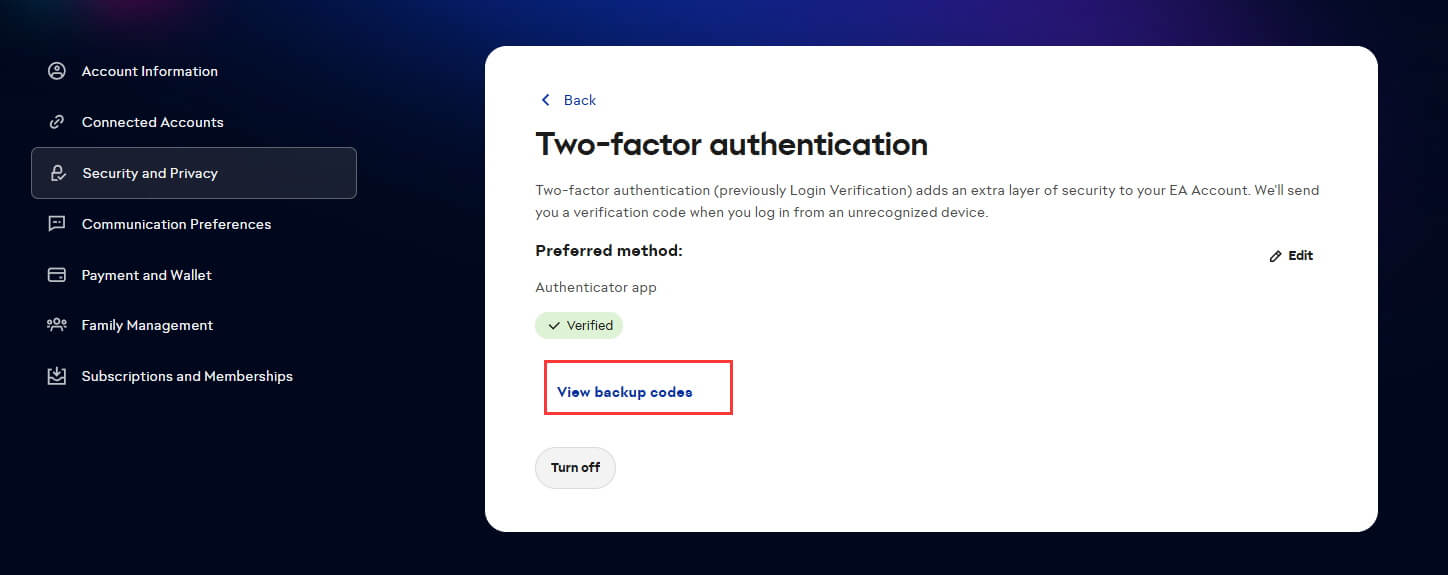
Step 4:
Copy codes 1, 2, 3, 4, 5, and 6 when needed.
If some codes are no longer valid, click the button to create new backup codes.
1. Receiving Your Order
-
Place your sign in an open area of the Church of Elleh — do not hide it in corners or haystacks.
-
If you don’t get all the items in one trade, return to your world and leave your sign again. You will be summoned for the remaining items.
2. Avoiding Invaders
-
It is recommended to use Duelist’s Furled Finger to reduce the risk of invasions.
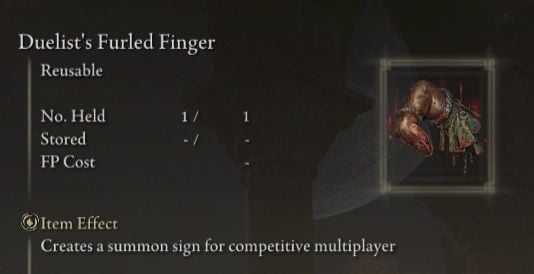
Where to Get Duelist’s Furled Finger
-
Found in the northernmost zone of Limgrave on a burnt pillage corpse, next to the Frustrated Spirit.
3. Picking Up Items Quickly
-
Equip a shield and use a defensive stance to speed up item collection.
4. Completing Large Rune Trades Quickly
-
After picking up the Runes, open your Inventory → Select Lord’s Rune → Use Selected → Use 99/99 to consume them all at once.
Was this article helpful?
Yes / No
Have more questions? Online Support
Helpful | Thanks for your feedback!
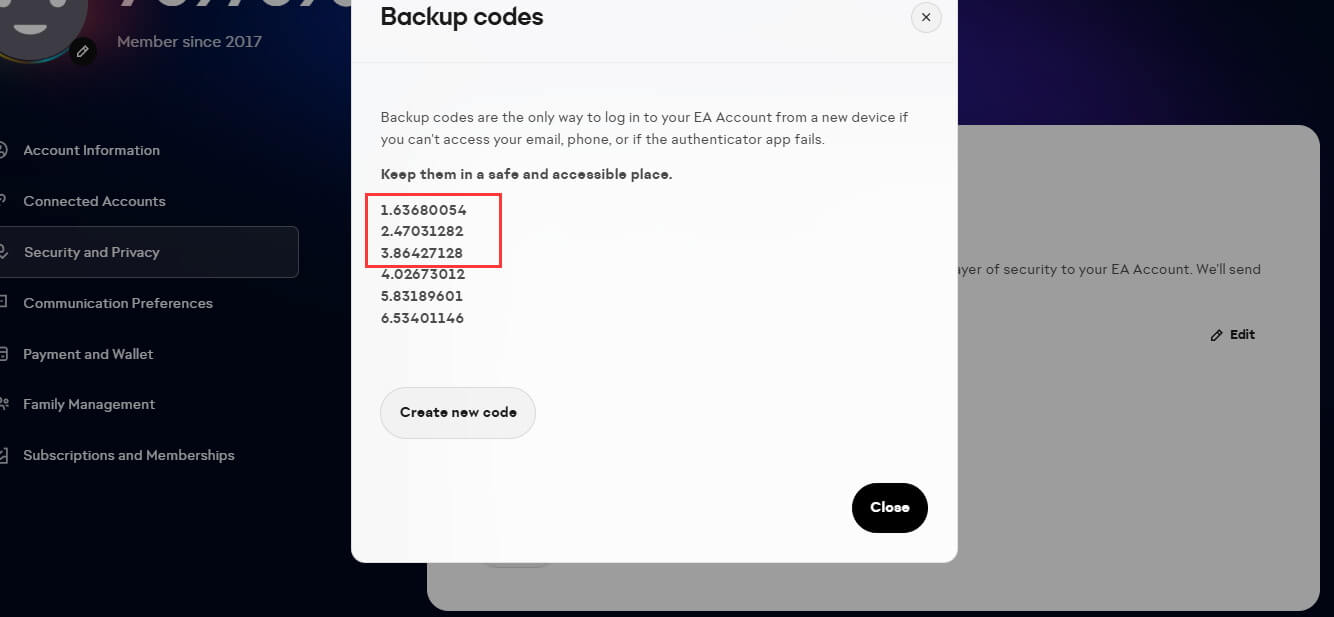
ORIGIN BACKUP CODES
Step 1:
Go to the official EA security page: https://myaccount.ea.com/cp-ui/security/index

Step 2:
Click Security in your account settings.
Step 3:
Press View Backup Codes to access your recovery codes.
Step 4:
Use backup codes 1–6 when needed.
If some codes are already used, click the button to generate new ones.
Was this guide helpful?
Yes / No
Need help? Contact Online Support
Helpful | Thanks for your feedback!
Step 1:
Visit the EA security page: https://myaccount.ea.com/cp-ui/security/index
Step 2:
Log in and click Security.
Step 3:
Click View Backup Codes to see your codes.
Step 4:
Copy backup codes 1, 2, 3, 4, 5, and 6 and use them when placing your order.
If any codes are already used, you can generate new ones using the provided button.
Was this article helpful?
Yes / No
Have more questions? Online Support
Helpful | Thanks for your feedback!
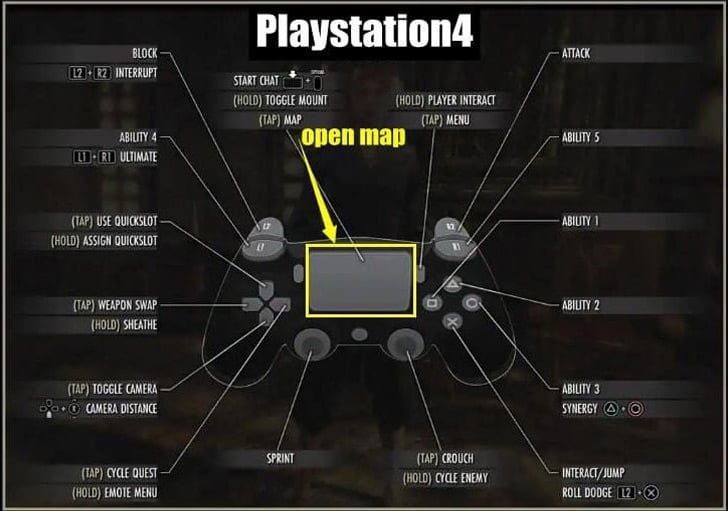
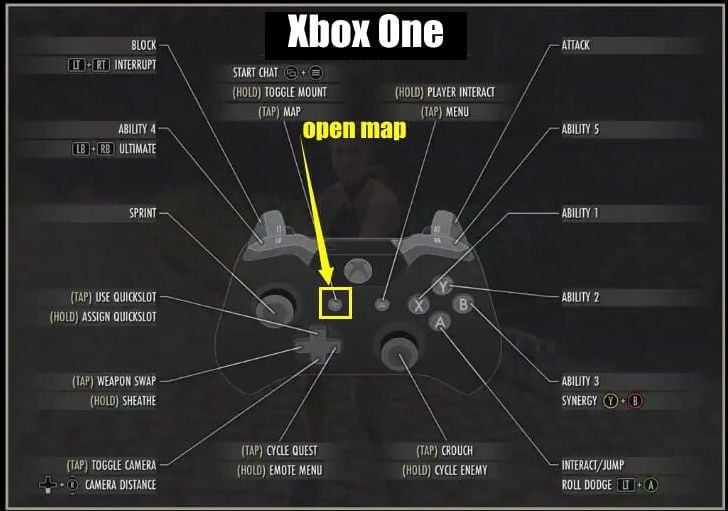
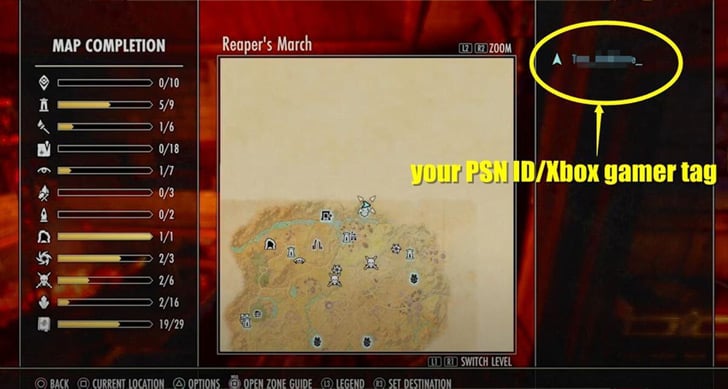
For ESO PS4 Gold or ESO Xbox Gold customers, your PSN ID (PlayStation Network ID) or Xbox Gamer Tag is required so that our supplier can quickly find you in-game.
-
Open your Map in Elder Scrolls Online.
-
Your PSN ID or Xbox Gamer Tag is displayed in the upper right corner of the screen.
If you have additional questions, contact us via Live Chat or Email at [email protected]. Our operators are available 24/7 to support you.
Buy cheap and fast ESO Gold for your PlayStation or Xbox — ezbuff is the best place to go!
Was this article helpful?
Yes / No
Have more questions? Online Support
Helpful | Thanks for your feedback!
When you start the game, a Start Game option will appear.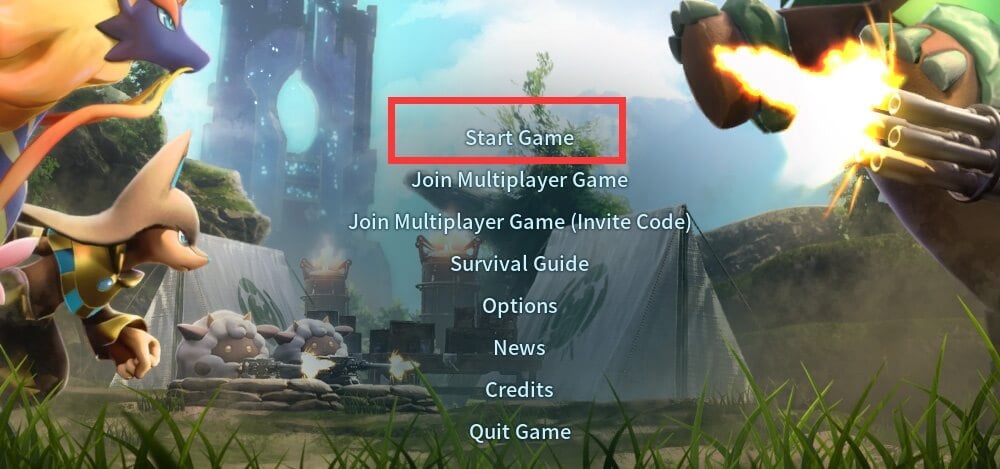
Click Start Game to create a New World — this becomes your local server.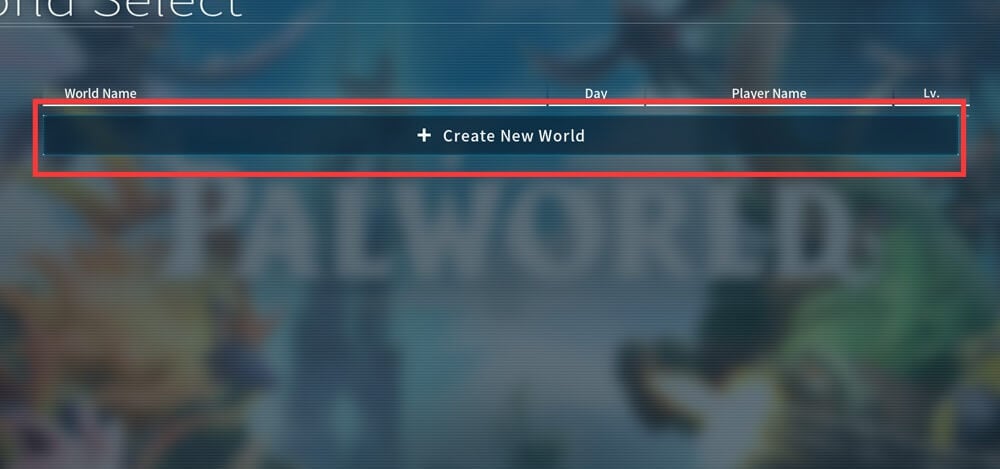
If you want your friends to join your local server, make sure to turn on multiplayer.
Was this article helpful?
Yes / No
Have more questions? Online Support
Helpful | Thanks for your feedback!
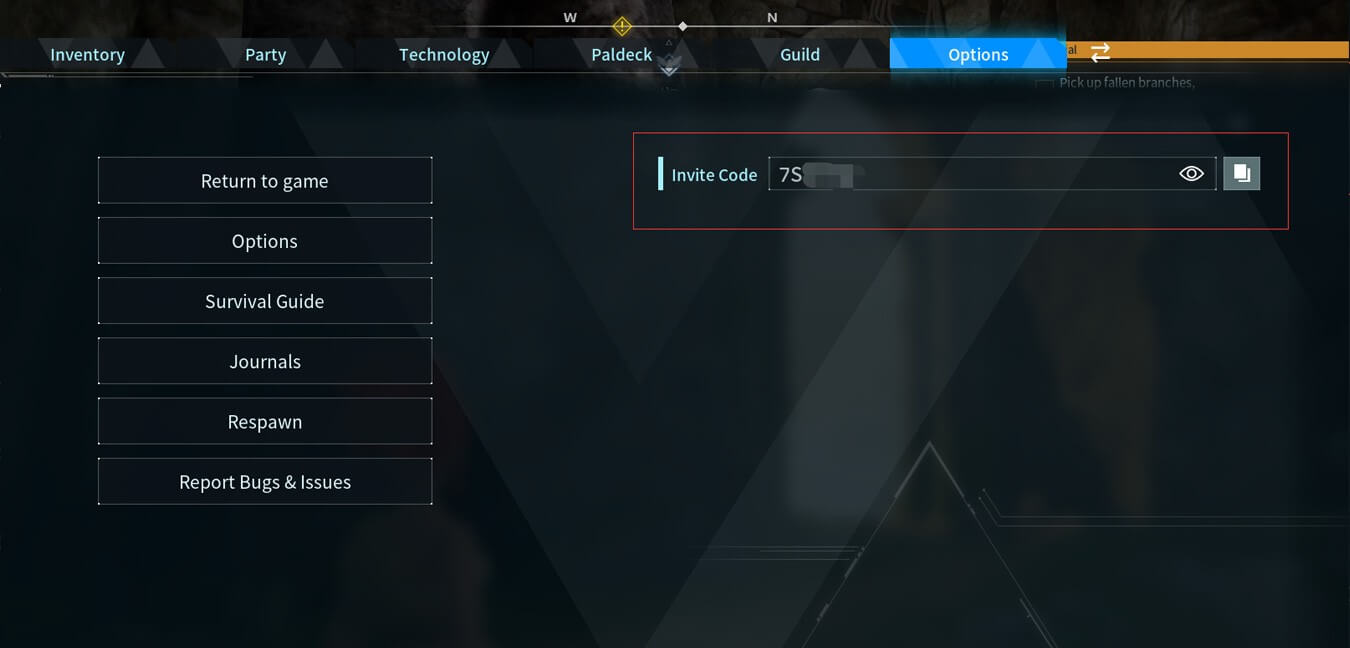
When you create a New World and turn on multiplayer, you can invite friends or other players to join your server.
-
To let others join, you need to provide them with your invite code.
-
Press ESC to open Options, where you can find your invite code.
-
Send the code to your friends, and they will be able to join your local server.
Was this article helpful?
Yes / No
Have more questions? Online Support
Helpful | Thanks for your feedback!
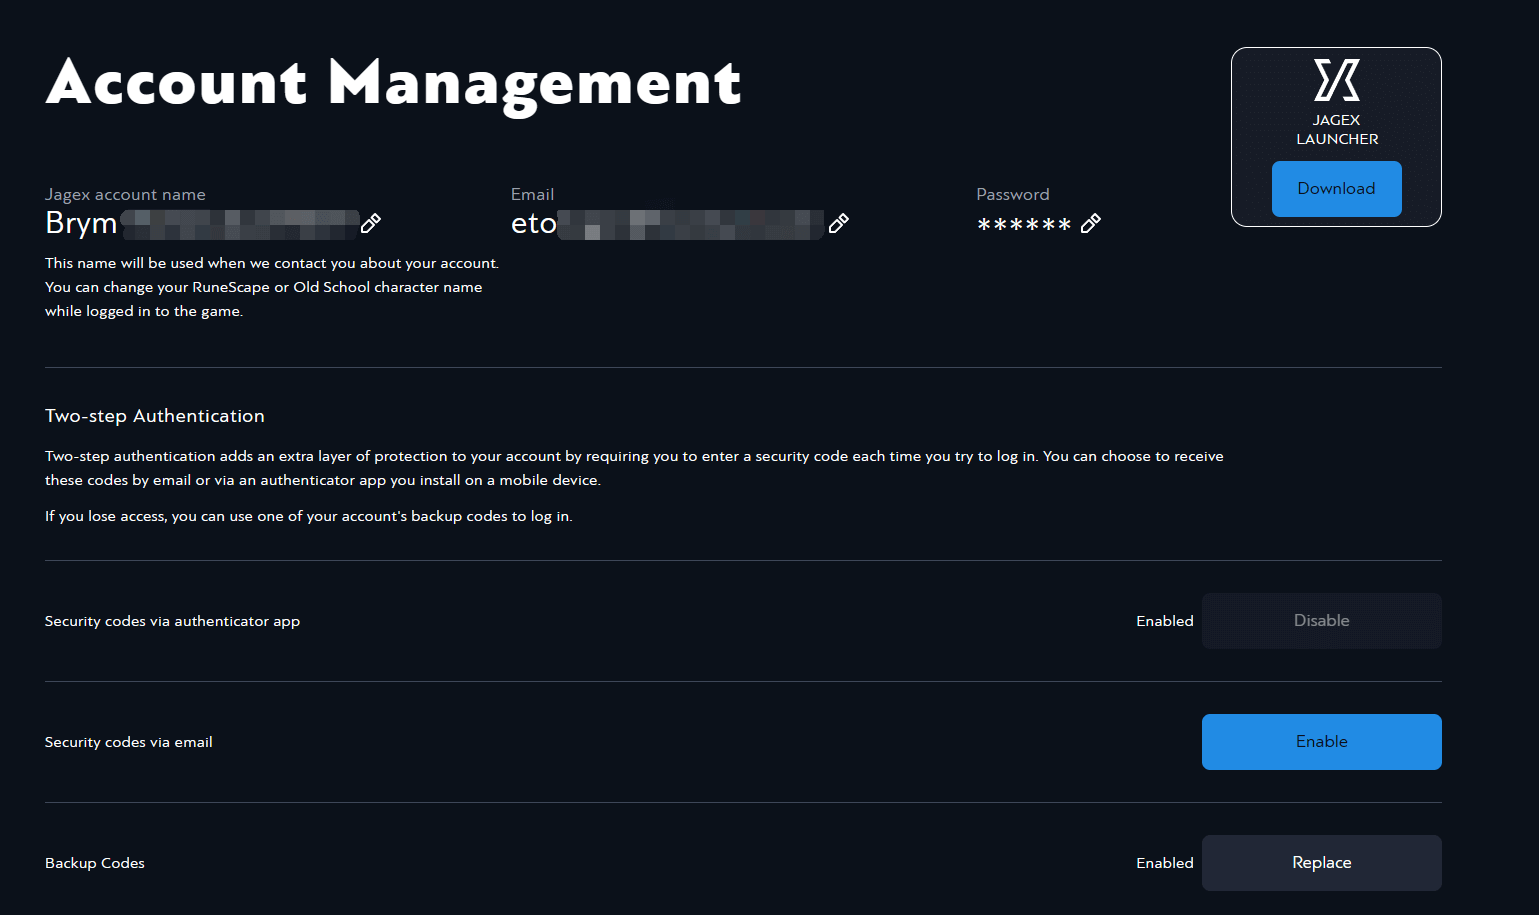
Step 1:
Log in to your Jagex account and go to the Account Management page.
Step 2:
Enable Security Codes using an authenticator app (Google Authenticator or Microsoft Authenticator is recommended).
Step 3:
After enabling, you will receive 10 one-time-use backup codes.
-
Download and save them in a safe place.
-
Confirm “I have kept my backup codes in a safe place” and click Finish (this button remains inactive until confirmation).
Note: If any backup codes have already been used, click Replace to generate a new set and provide the updated codes.
Was this article helpful?
Yes / No
Have more questions? Online Support
Helpful | Thanks for your feedback!